Monthly Archives: December 2018

The Best Neighborhoods in Paris: Where to Stay on Your Visit

a person cycling through the streets of Paris
Posted: 12/16/2018 | December 16th, 2018

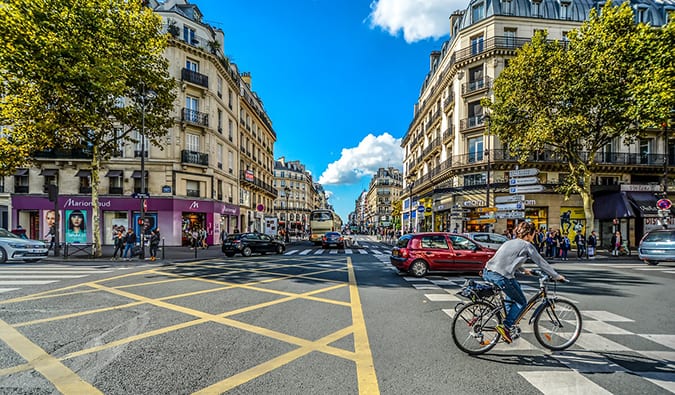
Paris. The city of lights. With 20 arrondissements (neighborhoods) and thousands of hotels, hostels, and apartments, finding the best place to stay in Paris can be a bit of a challenge.

What’s the best overall neighboorhood?
What’s the cheapest neighboorhood in Paris?
Where do all the cool kids stay?
Where’s a good spot for families?
What’s close the city center?

There are a lot of questions.

Over the course of dozens of visits to Paris, I’ve stayed all over the city and in all types of different accommodations. Every neighborhood in Paris has its own unique personality. Its own pros and cons. There’s always a trade-off to be made here.

Paris sprawls and, with attractions throughout the city, first-time travelers can be a bit unsure of where to stay.

So, I’ve taken my experience in Paris, and created this guide to the neighborhoods of Paris to help you figure that out! (I included a brief description of each area, why I like it, and my favorite accommodations!)

Bastille

Bastille, Paris; photo by patrick janicek (flickr:@marsupilami92
Bastille takes its name from the famous prison that used to occupy this neighborhood (the storming of which started the French Revolution). Today, the prison is gone and this part of town has become a busy and animated and known for its bars and clubs that are popular with Parisian youth. If you are looking for a fun arrondissements to stay in, I’d recommend here. It’s centrally located and the tiny cobblestone streets give you the most Parisian of feels!

Best places to stay in Bastille

  • BUDGET: Auberge Internationale des Jeunes – This is a safe and well-maintained hostel but the amenities are basic – there is no kitchen for cooking your own meals, but there is a microwave and free breakfast is served daily from 7-9:45am. There is also a common room with vending machines where people like to hang out, and a secure luggage storage area. Note: You have to be under 30 years old to stay here!
  • MID-Range: Paris Bastille – Located right across from the Opera House and near the Gare de Lyon, the Paris Bastille is an elegant, quiet hotel with soundproofed rooms and large walk-in showers. You can start your morning with a coffee and fresh croissant in the hotel bar while reading one of the free newspapers.
  • LUXURY: Hotel l’Antoine – This boutique hotel was once a 17th century convent, but its modern design of brightly patterned cement tiles, wallpapers, and decor make it an eccentric space. No two rooms are alike here. There’s an honesty bar and lounge, and a hearty breakfast buffet each morning. The fitness room has a sauna with a cold shower too!

Latin Quarter

Latin Quarter, Paris; Photo by xiquinhosilva (flickr:@xiquinho)
The Latin Quarter is filled with narrow streets that turn at weird angles and open onto little café-lined squares. There are a lot of restaurants, bars and jazz clubs around here. This is one of my favorite parts of the city. I love wandering around here. It always feels like you’re stepping back a few hundred years in history. It’s a busy area and not as quiet as other sections of Paris but, when you’re here, you’re in the middle of it all!

  • BUDGET: Young & Happy Hostel – This hostel has pretty simple rooms but comfy beds, small but well-cleaned showers, and a large kitchen space. The common room is an old cellar lined with stone, making for a cozy and unique spot to hang out. The staff will sometimes host evening events, and there’s a daily Happy Hour for mingling with other travelers. They also offer free breakfast of croissants, coffee, and juice!
  • MID-RANGE: Hotel Minerve – On a quiet street near Notre Dame and the Sorbonne, Hotel Minerve is housed inside a historic 1864 Haussmanian building complete with flowered balconies. This place has been recently renovated to give it some quirky charm, like walls of stone, visible beams, and original artwork throughout. There’s a large central courtyard as well. You can get a decent breakfast spread each morning for 9 EUR, and there’s a handy airport shuttle.
  • LUXURY: Grand Hotel Saint Michel – Grand Hotel Saint Michel is within walking distance to the some of the area’s best attractions, like the Jardin du Luxembourg and the Panthéon. It caters quite a bit to biz travelers, but it isn’t stuffy and the location is unbeatable. There are a bunch of high-end services onsite, like concierge, a fitness center, and even a hammam!

Champs-Élysées

Champs-Élysées, Paris
The most famous and upscale street in Paris is lined with cinemas, cafés, luxury specialty shops, big brand names, and chain restaurants. It’sa fun place to club-hop at night or snap photos and shop during the day. The area surrounding the street is one of the most upscale and luxurious in Paris. If you stay off the main street, you’ll find it to be very quiet. It’s nice and centrally located to everything but theere’s not a lot of “cool” things to do in the area.

  • BUDGET: Bvj Champs-Elysées – This hostel is one of the most historical hostels in Paris, having been around since 1948 and housed in a former mansion. They have a free French breakfast each morning, free storage luggage, and there’s a sunny private courtyard to hang out in.
  • MID-RANGE: Hotel Magda Champs Elysées – This hotel has modern, clean and stylish rooms. The bar makes for a good spot to work while having a cocktail (or some complimentary coffee). They even put smartphones in the room so you can make free phone calls, watch Netflix, and more. There’s an excellent courtyard here too.
  • LUXURY: MARQUIS Faubourg Saint-Honoré – This is a chic hotel! The rooms are super plus (if not a bit small) with marble fitures and clawfoot bathtubs. Skip the breakfast. It’s over priced.

Le Marais

Le Marais, Paris; Photo by Ninara (flickr:@ninara)
Le Marais (meaning “the marsh”) has been revitalized in the last few years and is now a stylish, lively part of the city filled with hip art galleries, boutiques, and cafés. The tight, winding streets are lined with old architecture, half-hidden courtyards, and quite a few museums. You’ll also find some of the best restaurants and bars in town here. It’s my favorite area of Paris. Additionally, it’s the center of Paris’ gay life, so you’ll be able to find a lot of gay bars, cafés, and shops here, as well as plenty of gay-friendly restaurants.

  • BUDGET: Auberge de Jeunesse MIJE Fourcy – This is a unique budget hostel, as it’s three 17th century buildings renovated to create a hostel trio: MIJE Fourcy, Fauconnier, Maubuisson. The rooms are pretty basic but there’s a free breakfast. Don’t miss the courtyard.
  • MID-RANGE: Villa Beaumarchais – This tiny and attractive hotel is on a quiet side street within walking distance to the Opéra Garnier and la Place de la Madeleine. The rooms are antique with a lot of wood furtniture and floral wall paper. It’s very cozy here. Try to get one that overlooks the interior courtyard. The American-style breakfast buffet is also good!
  • LUXURY: Pavillon de la Reine – Pavillon de la Reine is in the Place des Vosges, one of the most beautiful and oldest squares in the world, and the vine-covered building is gorgeous. The rooms have amazing, unique décor with antique furnishings and enormous windows, and there’s a spa and a fitness center onsite. This is a wonderful little hideaway, and Queen Anne of Austria actually once stayed here. Eat at Restaurant Anne if you feel like splurging.

Montmartre

Montmartre, Paris
Home to starving artists for decades, Montmartre offers a stunning view of Paris, arty cafés, bars, cobblestone streets, and the only winery within the city limits. It’s one of the hipper parts of Paris, even if it has lost some of its old grandeur. It’s home to a lot of students as the rents in this part of town are much cheaper than elsewhere. It’s also pretty loud at night so try to stay on one of the beautiful side streets.

  • BUDGET: Le Village Montmartre By Hiphophostels – This small, cozy hostel with a view of the Sacre-Coeur is literally surrounded by bars, restaurants, and supermarkets. There’s a French breakfast each morning for 6 EUR, or you can just take advantage of the large kitchen for cooking your own meals.
  • MID-RANGE: Le Relais Montmartre – This hotel is on a quiet street in Montmartre. It’s a great value. The rooms have a rustic charm with exposed beams and vintage furniture. Check out the breakfast – it’s really good and the cellar restaurant is unique.
  • LUXURY: Terrass Hotel Montmartre by MH – The hotel bar’s views of Paris are stunning, and the sunset is spectacular. The rooms are larger than most in town and have beautiful décor in a classic Parisian style. The hotel offers yoga classes and spa treatments. Make sure it’s brunch on the terrace.

Île de la Cité and Île Saint-Louis

Île de la Cité and Île Saint-Louis, Paris
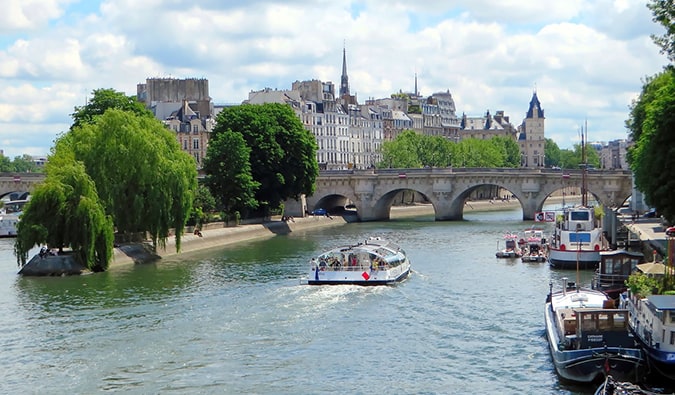
The two islands in the Seine are the historical center of Paris. The Romans set up camp on the Île de la Cité in 52 BC, and the island is now home to Notre-Dame, Sainte-Chapelle, administrative buildings, and the Conciergerie. It’s super and louad. The Île Saint-Louis, on the other hand, is a quiet neighborhood for Paris’ rich and powerful, filled with well-preserved historic homes and streets. If you want luxury and quiet, you stay here. It’s fancy hotels and little else.

  • BUDGET: HA! That doesn’t exist here!
  • MID-RANGE: Hôtel De Lutece – Notre-Dame – This luxury is surprisingly affordable considering it’s on Île Saint-Louis. It’s on the smaller side, but with a lot of cozy touches – like working wood fireplaces. There are only 23 rooms here, but each one is air-conditioned and soundproofed. It feels more like a house than a hotel.
  • LUXURY: Hotel Saint-Louis en L’Isle – This hotel is located in a 17th century townhouse, which has retained most of its original charm, like exposed wooden beams and stone walls. The rooms are spacious and regal. It’s one of the most luxrious hotels in the area and will make you feel like royalty. Breakfast is served in the stone-vaulted cellar!

Montparnasse

Montparnasse, Paris; Photo by Guilhem Vellut (flickr:@o_0)
Montparnasse is one of the more modern parts of Paris, with a lot of more office buildings, new apartments, and a more local feel to it. Located near the train station with the same name, Montparnasse has inexpensive accommodations to stay and a good number of restaurants around. It’s not as classically pretty as other parts of the city but it’s a lot more “local” then other districts and the city.

  • BUDGET: FIAP Jean Monnet – This is not a party hostel – there are often school groups, and it is similar to a hotel conference center. It’s in a quiet neighborhood. However, you can’t bring in your own food (they check!). Dorms are available only for 18 to 30 year-olds.
  • MID-RANGE: Novotel Paris Centre Gare Montparnasse – This is a comfortable, business-style chain hotel has everything you’d expect from a chain. The rooms have large walk-in showers and memory foam mattresses. It’s modern and bright. They offer free coffee and tea, and if you have kids, they’ll love the balloon animals the staff makes!
  • LUXURY: Niepce Paris Hotel – This small boutique hotel is charming. It’s a new hotel, so everything is still shiny. Some rooms have outside patios with jacuzzi tubs, but even the junior rooms are modern and luxurious. The restaurant serves unique Japanese/French fusion cuisine.

Les Halles

Les Halles, Paris; Photo by Sheila Thomson (flickr:@sheilaellen)
This chic, bustling neighborhood is centered around Paris’ former central marketplace, Les Halles (pronounced lay-AL), which was torn down in the 1971. The market was the “stomach of Paris” for centuries. There’s now an underground shopping mall, and the surrounding streets are filled with designer stores, cafés, and artisanal food shops. Staying here puts you in the center of all the action.

  • BUDGET: Appi Hotel – It’s hard to find a good budget option in this part of town, but Appi Hotel is the best place. There’s nothing particularly noteworthy about this hotel, but the rooms are private and clean. Keep in mind that not all of them come with private bathrooms, however.
  • MID-RANGE: Hôtel du Cygne – Hôtel du Cygne will make you feel like you’re at home – literally, the owner’s mother has hand-sewn all of the bed linens and curtains. There are just a few tiny rooms in this hotel but it’s a comfortable spot, and located just a quick walk to the Etienne-Marcel Metro Station. There’s a breakfast each morning (which you have to pay for).
  • LUXURY: Hôtel Novotel Paris les Halles – Air-conditioned rooms, 24h room service, giant beds – what’s not to love? Novotel Paris Les Halles is next to the big shopping areas (like the Rue de Rivoli), and also within walking distance to the Louvre and other attractions. There’s a lovely patio where you can enjoy traditional French meals or cocktails, or hang out in the lounge with the other guests.

Saint-Germain-des-Prés

Saint-Germain-des-Prés, Paris; Photo by Fred Romero (flickr:@corno.fulgur75)
Saint-Germain-des-Prés used to be home to artists, writers, and thinkers. Now it’s one of the most expensive and trendy neighborhoods in Paris (home to celebrities), with high-priced art galleries, designer shops, and fancy restaurants. It’s a beautiful area to walk through and one of my favorite in town It’s not cheap the stay in but it’s one of the best areas of the city. It’s everything you imagine Paris to be.

  • BUDGET: Hotel de Nesle – There are unfortunately not too many budget accommodations in this part of town. If you like kitsch, Nesle is the place for you! There’s hardly a single wall that isn’t covered in some kind of adornment. Some bathrooms have private rooms with showers, while others are shared. There’s an inner garden where you can relax.
  • MID-RANGE: Hôtel M Saint Germain – This boutique hotel is super stylish, and each air-conditioned room is decorated with bright pops of color! Some rooms have small balconies. There’s a delicious breakfast here too.
  • LUXURY: Hôtel Récamier – The staff is extremely helpful with arranging any outings you’d like to do, and the complimentary afternoon tea is a nice touch. The rooms are spacious and air-conditioned (I also love the mattresses), and the building is historic and beautiful.

Belleville

Belleville, Paris; Photo by Urban Isthmus (flickr:@66944824@N05)
Belleville is definitely one of the grittier parts of town, with a busy Chinatown and a whole melting pot of different cultures. The center of Paris’ immigrant community, Belleville is slowly become hip with the city’s hipsters and younger kids. Some of the best ethnic food is food here; there’s an awesome street market; and it’s right next to the La Marais so you can always walk over and get some fancy French food. I find myself staying in this part of town more and more.

  • BUDGET: Les Piaules – This newish hostel has a fantastic chimney lounge and a rooftop space. The bar/restaurant on the ground floor is popular with locals and groups, so it’s always a fun time. The rooms are super modern and the beds comfy. It’s one of my favorite hostels in town.
  • MID-RANGE: Hotel des Pyrénées – While there is nothing particularly stand-out about this hotel, it has recently undergone some big renovations, so you’ll find sleek and modern rooms here at affordable prices. There are family rooms for up to four people.
  • LUXURY: Hotel Scarlett – Hotel Scarlett is a trendy, refurbished hotel with seriously beautiful spaces. The beds are large and comfortable, and each room comes with a flat-screen TV. The helpful concierge will help you find your way around Paris no problem.

Eiffel Tower/Champs de Mar

Champs de Mar, Paris
As you might have guessed, Eiffel Tower/Champs de Mar is the place to be if your main reason for visiting Paris is to see the iconic Eiffel Tower (and to have easy access to some other huge attractions). Other than the impressive architecture, there are several great natural history and modern art museums to check out, as well as the sprawling Parc du Champ-de-Mars.

  • BUDGET: 3 Ducks Hostel – A 10-minute walk from the Eiffel Tower, 3 Ducks has one of the best locations in town. The staff is friendly, the rooms are small but comfortable, and the showers are clean. This is a more upscale hostel with recently revamped decor.
  • MID-RANGE: Hôtel Eiffel Kensington – A no-frills hotel, but it’s meters from the Eiffel Tower and you can get private single rooms at decent prices. The rooms are spacious enough and come with a desk. I like the fluffy pillows.
  • LUXURY: Pullman Paris Tour Eiffel – The rooms here are all modern and minimilist with leather furniture and sleek finishings. Most have a desk and a little couch. There’s a fitness room and a really nice terrace for dining. Each room comes with amazing views over the city, and some come with balconies looking onto the tower.

***

No matter where you choose to stay in Paris, you can’t go wrong. The city is super well connected via metro, there’s no such thing as an area with bad food, and everywhere is beautiful (it is Paris after all!).

For me, the Marais, Latin Quarter, Bastille, and Saint Germain are the four best areas to stay in Paris.

But every nighborhood has something for you so just pick the one you want to be in that suits your needs!

Get Your In-Depth Budget Guide to Paris!

Nomadic Matt's Guide to ParisFor more in-depth information, check out my guidebook to Paris written for budget travelers like yourself! It cuts out the fluff found in other guides and gets straight to the practical information you need to travel and save money in one of the most beautiful and romantic cities in the world. You’ll find suggested itineraries, budgets, ways to save money, on and off the beaten path things to see and do, non-touristy restaurants, markets, and bars, and much more!! Click here to learn more and get started.

Book Your Trip to Paris: Logistical Tips and Tricks

Book Your Flight
Find a cheap flight by using Skyscanner or Momondo. They are my two favorite search engines because they search websites and airlines around the globe so you always know no stone is left unturned.

Book Your Accommodation
You can book your hostel with Hostelworld. If you want to stay somewhere other than a hostel, use Booking.com as they consistently return the cheapest rates for guesthouses and cheap hotels. I use them all the time.

Here’s a list of my favorite hostels in Paris in case you want more options that what is listed here!

Don’t Forget Travel Insurance
Travel insurance will protect you against illness, injury, theft, and cancellations. It’s comprehensive protection in case anything goes wrong. I never go on a trip without it as I’ve had to use it many times in the past. I’ve been using World Nomads for ten years. My favorite companies that offer the best service and value are:

Looking for the best companies to save money with?
Check out my resource page for the best companies to use when you travel! I list all the ones I use to save money when I travel – and I think will help you too!

Looking for more information on visiting Paris?
Check out my in-depth destination guide to Paris with more tips on what to see, do, costs, ways to save, and much, much more!

Photo credits: 2, 3, 5, 9, 10, 11

The post The Best Neighborhoods in Paris: Where to Stay on Your Visit appeared first on Nomadic Matt's Travel Site.

7 Editing Tips to Improve Your Travel Photographs

Blue pink photo of lightning at dusk
Updated: 12/09/2018 | December 9th, 2018

Today, professional photographer Laurence Norah of Finding the Universe, finishes his five-part series on taking better travel photos. In part five, Laurence is giving some simple post-processing techniques that you can use to make your travel photos wow your friends and family! Editing your photos is just as important as how you compose them, so I hope you’re ready to take some notes!

One of the most misunderstood parts of digital photography is what happens after you take the shot: editing your photos, aka post-processing. This is where you edit the images you have taken, to create the final product.

Post-processing is the equivalent of the darkroom from the days we shot in film.

In today’s post, we’re going to be covering some ideas for editing your photos, from the basics (cropping and leveling), through to more complicated actions like recovering shadow and highlight information.

Editing Photos: 7 Editing Tips for Your Travel Photos

1. How to Crop Your photos
The crop tool allows you to change the size of your image, and also to change the aspect ratio. For example, you can crop an image from a rectangular shape to a square shape. There are many reasons you would want to crop, including for publishing in different formats and aspect ratios.

Let’s take a look at the first photo from this post, a lightning shot I took on a recent trip to the Florida Keys. Here’s the original version without cropping:

Blue dark pink nature photo of lightning at dusk

And the edited version, post-crop:

Blue pink photo of lightning cropped

Compared to the original, I have cropped the image to remove the dark part of the pier on the right-hand side of the image and recomposed using the rule of thirds, so I have one-third land and two-thirds sky. This makes the lightning bolt more the focus of the shot.

You might wonder why I didn’t just compose properly when taking the shot. Well, in this case, I was doing a long-exposure shot without a tripod, so had the camera balanced on the edge of the pier for stability. That very much limited my ability to perfectly frame the moment, so I just shot wider, knowing I’d be able to crop the shot appropriately after the fact.

Let’s look at what cropping looks inside a couple of the tools available.

Here’s an example of cropping in Snapseed:

Blue pink nature photograph of lightning cropping mask Snapseed

And the same thing in Lightroom:

Blue dark pink photo of lightning lightroom cropping mask Lightroom

In both cases, cropping is very simple: it just involves you selecting the crop tool and then selecting the area you want to keep with your mouse or finger. Then you apply the changes, and voilà, your new cropped image is ready to go.

As you see from this and later examples, the tools look similar across different platforms, so it’s easy to apply the learning you have from one tool to another.

2. How to Level Your Travel Photos
One of my personal petty annoyances in photography is when the horizon line in a photo isn’t level. Sometimes when we’re caught up in the moment, this basic compositional rule is forgotten — but the good news is that editing your photos to make them level is also very easy.

I’ll use the lightning shot as my example again. Balancing the camera on the edge of the pier meant that the shot wasn’t level — this is particularly noticeable to the eye when the image has a clearly defined horizon line, such as the sea.

If we look at a zoomed in version of the image in its original form, with a line overlaid near the horizon, we can see that it’s not level — the line is closer to the horizon on the right-hand side than the left.

Blue pink nature picture of lightning at dusk leveling mask

In Lightroom, the level tool is part of the crop tool, and you can just rotate the image to suit. When you use the level tool, a grid will appear to help you get the alignment correct. Here’s a screenshot of that in action in Lightroom.

Blue pink nature photo of lightning straightening mask Lightroom

And here’s the same procedure in Snapseed, where the level tool is called “Rotate”:

Blue pink nature photo of lightning rotate feature snapseed

Leveling an image is a really simple task that will take just a few seconds of your time, resulting in a much more visually pleasing image.

3. Vignetting Your Photos
Vignetting is about making parts of the image darker or lighter than other parts, in order to make it clearer what the subject of the shot is.

Some tools restrict your vignette to the corners, but in applications like Snapseed and Lightroom you can selectively darken and lighten areas of the image — you don’t need to restrict yourself to the corners.

Taking the lightning shot above, let’s load up the vignette tool in Snapseed.

Blue pink nature photo of lightning outer brightness vignette

Here we have options for how big to make the “center size,” i.e., the area to be edited. Inside this area, everything can be made brighter (inner brightness) and everything outside the area can be made darker (outer brightness). We can also do it in reverse, making the inner darker and the outer brighter.

Let’s apply the vignette tool to the lightning bolt, to give you an idea of the effect:

Blue pink nature photo of lightning inner brightness vignette

Above are the settings I chose for outer brightness and inner brightness, while below is the size of the vignette itself, which is based on the center size setting.

Blue pink nature photo of lightning vignette center point

Vignetting is particularly good for portraits, and anywhere where you really want to make the subject of the image more clearly obvious to the viewer.

4. How Change Shadows and Highlights in Your Photos
Sometimes when we take a photograph, parts of the shot might end up being darker or brighter than we want. We refer to the dark areas of the shot as shadows, and the bright areas of the shot as highlights.

We can fix this by changing the brightness of the shadow and highlight areas specifically, using either the “Shadow” or “Highlight” tool. This is a tool that works particularly well on RAW files as they retain more information on the shadow and highlight areas of an image compared to a compressed JPG, which discards most of this information in order to save file size.

Let’s take a quick look at adjusting shadows and highlights using Lightroom. In Snapseed, shadow and highlight adjustment can be found under the “Tune Image” setting.

Here’s a shot of a couple enjoying a bonfire and fireworks display in Edinburgh during Hogmanay:

Contrast tutorial with fireworks at hogmanay in Lightroom - before

As you can see, the fireworks and bonfire are clearly visible, as are the torches the couple is holding, but the rest of the shot is dark. Let’s adjust the settings and see what we can get.

Contrast tutorial with fireworks at hogmanay in Lightroom - after

In this version of the image, the couple is much more visible, as is the hill the fireworks are on and the surrounding crowd.

To achieve this I increased the overall exposure of the image, making the whole image brighter, including the shadows and the highlights.

Then, as the shadow areas were still a little dark, I increased those a little more.

Finally, as the global exposure adjustment made the fireworks and bonfire too bright, I reduced the highlights a little bit to give the final result.

Shadow and highlight adjustment is useful in a wide range of scenarios to help balance the image out — bringing overexposed areas down in brightness, and helping to boost the shadows. Just be aware that a light touch is recommended — increasing the brightness of the shadows too much can result in a lot of noise being revealed, which might look unnaturally green or purple.

5. How to Adjust the Contrast
Contrast is about accentuating the difference between the light and dark parts of the image. Increasing the contrast of an image can dramatically improve the visual impact that has, by making the boundaries between those light and dark parts clearer.

Let’s take a look at a shot of people jumping against the sunset in the Sahara, for example, which I’ll be editing in Snapseed.

Girls jumping on sand dunes - original photo

There is nothing too wrong with this shot, but it lacks the visual impact that I wanted. Ideally, I would want the shapes of the people to be in full silhouette against the sun, but as it was shot the camera picked up some skin tones and clothing color.

Using the contrast tool, we can make the dark areas stand out against the bright areas.

Girls jumping on sand dunes - contract tutorial photo

And here’s the result:

Girls jumping on sand dunes - after photo

As you can see, this made the jumping figures and the dune more silhouetted against the sky. In most shots, you only want to tweak the contrast a little bit to get the desired effect, normally no more than +20 or so, but in this case, the higher number gave the best result.

6. How to Adjust Colors
Color adjustment is another important piece of the editing toolkit. We can adjust image color in all sorts of ways, from changing the overall “warmth” of the image (how blue or yellow it appears), to individually changing the hue and saturation of specific colors inside an image.

For this post, though, I just want to cover some very simple color changes you can use to make your images just a little more visually impactful.

The fastest way to adjust an image’s color is with the “Saturation” tool. This changes the appearance of every color in an image to make it more or less saturated. We can use the saturation tool to desaturate an image, eventually resulting in a black-and-white image with no color:

Photo of orange building and waterfall - black and white - desaturated

Or we can go all the way to the other end of the spectrum, and make the color incredibly saturated:

Photo of orange building and waterfall - neon - saturated

As with many edits, the key is to find a good balance — oversaturated images tend to look rather unnatural. Desaturated images can be very effective, and of course black-and-white is an excellent choice for all sorts of situations, in particular, portraits, architecture, and certain landscape scenes. But generally you would want to find a happy midpoint: not too oversaturated and not too undersaturated.

Photo of orante building and waterfall - normal

Saturation is adjusted on a sliding scale and is on the basic adjustments panel in Lightroom or the “Tune Image” option in Snapseed.

7. Blemish correction
The last area I’m going to touch on today is blemish correction, or “image healing.” Sometimes there will be something in an image that you really don’t want to be there, like an inconvenient pimple on someone’s face. This is easy to remove in all the major editing tools.

You can, in theory, remove any object from a scene, but the healing tool works best on distinct, small objects that are surrounded by uniform colors. This is because the heal tool has to replace the area you wish to remove with something else, and this works best when it has an area nearby that looks similar. So for example, a pimple on a face is surrounded by a lot of similarly colored skin, so the heal tool can easily calculate what to replace the pimple with based on the surrounding area.

For this example, I’m going to show how Snapseed can be used to replace an object in a scene. Here’s a group of people sitting on a sand dune in the Sahara:

People sitting on a sand dune in Lightroom 1

Let’s say for some reason I only wanted to have people sitting in my shot, and I need to remove the standing person. She is a good candidate for removal as she is separate from the rest, and the surrounding scenery is not too complicated.

In Snapseed, we load up the healing tool, then we zoom in on the object to be removed with the standard “pinch to zoom” gesture.

People sitting on a sand dune in Lightroom 2

Next, we use our finger to draw the area to be removed. It’s important to be as precise as possible because the tool is most accurate with small objects.

People sitting on a sand dune in Lightroom 3

Once we have drawn the area, Snapseed will edit it out, replacing it with the best guess of what is behind the object.

People sitting on a sand dune in Lightroom 4

As you can see, the result is impressive, with no real evidence that there was anyone standing there at all.

The healing tool is perfect for all manner of fixes, from editing out unwanted background strangers in your shot, to removing skin blemishes in portraits or power lines in landscape shots.

Best Photography Editing Software

Here is a list of the best editing tools out there:

  • Adobe Lightroom (PC or Mac)Lightroom is the industry standard tool for photography professionals. But this post is not going to focus on Lightroom, nor cover everything you can do in Lightroom, as it’s a massively complex tool, covering both photo management and photo editing.
  • iPhoto (Mac) – I list iPhoto here mainly because it’s a commonly used tool among Apple users. However, I personally never recommend using it. While it will let you do everything that I cover in this post and is better than nothing, the way it manages your photos makes it hard to migrate to a more sophisticated system further down the line if you choose to do so.
  • Picasa (PC or Mac)Picasa is a free desktop photo editing application from Google. It’s very simple, but it allows you to do everything I’m going to cover in today’s post. If Lightroom is a bit overwhelming, Picasa is a great, free place to start.
  • Snapseed (iOS or Android) – Another free Google tool, Snapseed is the best mobile image-editing app for both iOS and Android. It’s an incredibly powerful tool that, while simple to start using, has a great many features that take time to fully master. I use it for 95% of my mobile editing needs.

Let’s take a look now at what you can and should be using these tools for with your images.

***

Editing your photos is a crucial step that far too many people skip. As you can see from this lesson, there is much more to editing your photos than just picking a filter and posting your picture on Instagram. By incorporating some of these tips and techniques into your post-processing routine you’ll be able to improve your travel photography in leaps and bounds.

So get out there and start taking pictures!

Laurence started his journey in June 2009 after quitting the corporate life and looking for a change of scenery. His blog, Finding the Universe, catalogs his experiences and is a wonderful resource for photography advice! You can also find him on FacebookInstagram, and Twitter.

Travel Photography: Learn More Tips

For more helpful travel photography tips, be sure to check out the rest of Laurence’s travel photography series:

LEARN TO GET OUT OF AUTO!

capture the world photography courseIf you are looking to really get into photography and want to master your camera and take amazing photos when you travel, Laurence and I have developed a comprehensive photography course that will get you out of auto and have your friends go “Wow! That’s really breathtaking!” in no time. Click here to learn more about the course and start today!

Book Your Trip: Logistical Tips and Tricks

Book Your Flight
Find a cheap flight by using Skyscanner or Momondo. They are my two favorite search engines because they search websites and airlines around the globe so you always know no stone is left unturned.

Book Your Accommodation
You can book your hostel with Hostelworld. If you want to stay elsewhere, use Booking.com as they consistently return the cheapest rates for guesthouses and cheap hotels. I use them all the time.

Don’t Forget Travel Insurance
Travel insurance will protect you against illness, injury, theft, and cancellations. It’s comprehensive protection in case anything goes wrong. I never go on a trip without it as I’ve had to use it many times in the past. I’ve been using World Nomads for ten years. My favorite companies that offer the best service and value are:

Looking for the best companies to save money with?
Check out my resource page for the best companies to use when you travel! I list all the ones I use to save money when I travel – and I think will help you too!

The post 7 Editing Tips to Improve Your Travel Photographs appeared first on Nomadic Matt's Travel Site.

How to Take the Perfect Photo: Advanced Techniques

a man taking photos on a mountain
Updated: 12/09/2018 | December 9th, 2018

Today, professional photographer Laurence Norah of Finding the Universe, continues his five-part series on taking better travel photos. In this post, Laurence is taking it up a notch to give some advanced travel photography techniques such as long exposure shots, HDR, star shooting, and more!

One of the challenges we face as travelers is that so many of the places we visit have already been photographed extensively.

In today’s post, I want to share with you some advanced travel photography techniques that will help you get more creative with your travel photography. These more advanced concepts build upon the ideas in the first three posts in this series.

I’m going to cover four topics in this post on advanced travel photography techniques that will open up new creative possibilities for when you’re out and about:

  1. Long-exposure Photography
  2. Night Photography
  3. High Dynamic Range (HDR) Photography
  4. High Contrast Photography

Just click on the links above to jump direcly to that section.

Part 1: Long-Exposure Photography

Have you ever seen a photo of a waterfall where the water looks white and fluffy? Or a shot of a street at night where the cars have been replaced by streaks of light? Here’s an example of a waterfall to give you an idea of what I’m talking about:

Photo of waterfall, Glen Ivet Valley in Scotland by Laurence Norah

This was shot in Glencoe, a stunning part of the Scottish highlands. As you can see, the water’s surface has a silky, flat look, and the waterfall itself looks more like cotton than water. Additionally, the clouds in the sky have a sense of motion.

Here’s another shot, of the Dubai Marina at night, where you can see the cars have been replaced by streaks of light:

Picture of the Dubai marina night skyline

Both of these shots were achieved using the same technique, long-exposure photography.

I talked a little about using shutter speed in post two of this series, and how too low a shutter speed can result in blurry images due your hand movement. Long-exposure photography is all about taking advantage of that blurry effect, but as a result of the objects in the scene instead.

You are going to need a tripod to make this work, as otherwise, your images will be blurry everywhere rather than just where you want them to be.

The secret to long-exposure photography is to put your camera in either shutter-priority or manual mode, which will allow you to set how long the camera’s shutter is open for. This will be marked as “S,” “Tv,” or “T” mode on the mode dial if your camera has one. If you’re shooting using a smartphone, many recent models, such as the LG G4, also let you manually set the shutter speed via the camera app.

Screenshot of LG photography screen by Laurence Norah

For waterfall shots, you’re looking at any shutter speed slower than 1/15 of a second. For traffic, it will depend on the speed of the traffic, but you’ll need to shoot at speeds slower than one second. Both of the long exposure shots I’ve shared above were shot with a 30-second exposure.

If you are shooting in the daytime, you might need a neutral density filter in order to compensate for the amount of light available (see the travel photography gear post, the third in the series, for more information). If you’re shooting in manual mode, you’ll have to set the aperture to get the correct exposure. Try to avoid apertures higher than f/16 though, as they often result in lower-quality images.

Long-exposure photography will have you looking at the world and motion in new ways, and it opens up all sorts of creative possibilities. Have fun with it!

Part 2: Night Photography

When I travel, one of my favorite things is getting far away, to the middle of nowhere, and just looking up at the night sky. Away from the city lights, it’s is one of the most spectacular views available to us, and gazing up at it always helps me gain a sense of perspective.

Of course, once I’m done looking at it, I want to try and capture it as a photo. This isn’t as hard as you might think and, apart from a tripod, doesn’t need a great deal of expensive equipment to achieve. But shooting star trails does require more thinking than just pointing your camera at the sky and hitting the “expose” button.

There are two main types of star photography. First, you can do a long-exposure shot and turn the stars into streaks of light, like this:

Incredible photo of stars wheeling in Western Australia outback

This was a two-hour exposure I shot while camping in the Western Australian outback. Yes, two hours! (You need a lot of patience and a decent battery for long-exposure star photography.)

You can also do multiple long exposures lasting from 30 seconds to a minute and then stack the resulting photos together using specialist software like this. This reduces the “noise” that super-long exposures are known for, as well as the risk of your battery going flat mid-shoot, but it does require more work afterward.

However, most cameras won’t let you shoot for longer than 30 seconds in manual mode. You have to switch to “BULB” mode, whereby the shutter button will stay open for as long as you hold the shutter down. Some cameras have this in manual mode rather than a dedicated BULB setting — check your camera manual to find out how your model of camera works.

Image of camera body in bulb mode

You are unlikely to want to stand with your finger on the shutter button for two hours, but don’t worry, you have some options. The easiest is to invest in a remote release cable, which will let you “lock” the shutter button down for as long as you want. Alternatively, if you have a more modern camera with Wi-Fi built in, you might find that there is an app that lets you control the length of the exposure beyond 30 seconds.

Finally, consider the movement of the stars. The earth rotates from west to east, so if you want circular star trails, you’ll need to point your camera north or south. If you’re in the northern hemisphere, composing around the North Star (which remains stationary) is a good place to start.

The other type of star photo is where you capture the night sky without motion. This will likely still require a long exposure, but one that is not so long as to result in the stars blurring from motion. Around a 30-second exposure is the maximum before the motion of the stars from the earth’s rotation becomes apparent. Here’s a 30-second exposure of Venus setting in the Galápagos as an example:

Photograph of venus setting across Floreana, in the Galapagos Islands

The setup is very similar to star trail photography, in that you will need a tripod and will have to consider your composition. However, with only a 30-second exposure, you are going to need to increase the ISO on your camera to get as much light in as possible.

Modern cameras are capable of shooting at ISOs of 3200 and 6400 without introducing too much noise into the image. In addition, you’ll want to open your aperture as wide as possible — depth of field isn’t really a consideration when shooting the infinite! Open it as wide as it’ll go, preferably in manual mode.

In some ways, these shots are easier because you’ll be able to see the results a lot more quickly. Here’s a shot of the stars over France:

The stars and milky way over France

The Milky Way is an excellent subject for static star photography — it’s a natural leading line, as you can see in the shot above. This was a 30-second exposure at ISO 6400 and f/4, shot on a Canon 6D in manual mode.

Once you’ve gotten the hang of basic star photography, you can start to be a little creative. At these exposures, even a little light can make a big difference, so you can try “painting” objects with light, by using a flashlight and shining it on objects near you.

Part 3: High Dynamic Range (HDR) Photography

Have you ever noticed that sometimes your camera fails spectacularly to capture an image as your eyes see it? For example, the sky is too bright, or the shadows areas are too dark?

This is because our eyes have a much greater “dynamic range” than a camera has. Dynamic range is the difference between the darkest and lightest part of a scene that can be observed, and our eyes are able to resolve a much wider range in darkness and brightness than a camera can.

This is why you might end up with a shot that looks like this:

Photograph of a river and mountain

Or like this:

Photo of a river and mountain

…when in reality — to your eyes — the scene looked more like this:

Photograph of a river and mountain and a colorful sunset

The problem is that cameras struggle to capture the full range of the exposure, from the dark shadows through to the bright highlights. Either the sky will be a white washout, or the landscape will be dark and unrecognizable.

The solution is a technique known as high dynamic range photography or HDR. This simply requires you to take multiple photographs of the same scene at different exposures, and then put them together. This is also known as exposure blending.

If you have a relatively modern smartphone or camera, then it will probably have an HDR mode built in. The iPhone, in particular, has an excellent HDR mode. You can access this from the settings menu in your camera or smartphone menu. On a Canon camera for example, the menu is as follows:

HDR mode menu options on a gopro hero

Using your device in HDR mode is very simple, and it will do everything for you. Your device will take the necessary number of photos, align them if necessary, and then blend them together to give you a photo that looks more representative of the scene you saw.

The disadvantage of this is that you are leaving the camera to make all the decisions, and you won’t usually have the source images — you’ll just be presented with the final HDR image, and your camera will discard the interim files.

If you want more control over the final image, then you’ll need to set your camera to “bracket” the exposures for you. This will allow you to take a sequence of photos of different exposures just by holding the shutter down. To find this mode in your camera, look in the menu for auto exposure bracketing, or AEB.

Then you’ll have to use computer software to merge the images together into a single photo. There are a variety of software tools available to merge your images. I use Lightroom, Photoshop, and Photomatix Pro, but there are many others out there.

Shooting multiple photos at once does mean you need either a very steady hand or — you guessed it— a tripod. If your hand moves between the shots, then the images will likely need to be aligned, which doesn’t always work perfectly. In addition, be aware of moving objects, as these can create odd ghost effects as the software tries to combine images.

HDR works best in largely static, high-contrast scenes, particularly landscapes where there isn’t much movement and the difference in brightness between the darkest and lightest parts of the scene is pronounced.

Part 4: High Contrast Photography

Speaking of high-contrast scenes, don’t forget that you can use these to your advantage. You don’t have to use HDR; instead, you can use all that light to create wonderful silhouettes of your subjects.

This is a great way to get a different take on a subject, and used creatively can give you some standout images.

Stunning boat silhouette at sunset in the Seychelles

The shot above is the silhouette of a boat against two islands in the Seychelles. Shooting directly into the sun like this means that you are going to have to decide which area of the shot you want to correctly expose. If I had set up the shot so the boat was correctly exposed, the sky would have been a giant white mess as a result of the light from the sun.

I could, of course, have shot an HDR image, but in this case, a silhouette of the boat and two islands was a more attractive composition.

Other great subjects for silhouetting are people, trees…really, any object with a distinctive outline.

This sort of shooting will require a little practice, as the camera won’t know what sort of exposure you want. The joy of digital is that you can review a shot and try it again — particularly in a scene like this, where you have a bit of time to get the shot right before the sun sets. Be aware that your exposure meter might be indicating that you are over- or underexposing the scene.

The easiest way to get good results is to shoot in manual mode and set everything yourself. Keep the ISO rating as low as possible, and adjust your shutter speed and aperture according to the composition you want to achieve, considering the depth of field and any long-exposure effects you might be trying to achieve.

***

I use all the above travel photography techniques on a regular basis when I’m out and about in the world, looking to put a fresh perspective on a familiar scene. Admittedly, these are individually complex subjects to tackle, and it will take time to master each of them, but the rewards are very much worth it. Just start by picking one technique and work on it as often as you can. With regular practice, it will become second nature and you can move on to another. Travel photography is a slow process, but it’s a rewarding one if you’re willing to put in the work. If you aim for progress and not perfection, you’ll be taking better (and more advanced) travel photos in no time!

Laurence started his journey in June 2009 after quitting the corporate life and looking for a change of scenery. His blog, Finding the Universe, catalogs his experiences and is a wonderful resource for photography advice! You can also find him on FacebookInstagram, and Twitter.

More Travel Photography Tips!

For more helpful travel photography tips, be sure to check out the rest of Laurence’s travel photography series:

LEARN TO GET OUT OF AUTO!

capture the world photography courseIf you are looking to really get into photography and want to master your camera and take amazing photos when you travel, Laurence and I have developed a comprehensive photography course that will get you out of auto and have your friends go “Wow! That’s really breathtaking!” in no time. Click here to learn more about it!

Book Your Trip: Logistical Tips and Tricks

Book Your Flight
Find a cheap flight by using Skyscanner or Momondo. They are my two favorite search engines because they search websites and airlines around the globe so you always know no stone is left unturned.

Book Your Accommodation
You can book your hostel with Hostelworld. If you want to stay elsewhere, use Booking.com as they consistently return the cheapest rates for guesthouses and cheap hotels. I use them all the time.

Don’t Forget Travel Insurance
Travel insurance will protect you against illness, injury, theft, and cancellations. It’s comprehensive protection in case anything goes wrong. I never go on a trip without it as I’ve had to use it many times in the past. I’ve been using World Nomads for ten years. My favorite companies that offer the best service and value are:

Looking for the best companies to save money with?
Check out my resource page for the best companies to use when you travel! I list all the ones I use to save money when I travel – and I think will help you too!

The post How to Take the Perfect Photo: Advanced Techniques appeared first on Nomadic Matt's Travel Site.

19 Free (Or Cheap) Things to Do in Reykjavik

A view of Reykjavik
Posted: 12/8/2018 | December 8th, 2018

There’s no question that Iceland is an expensive destination to visit. But that doesn’t mean a trip there has to break the bank.

There are plenty of ways to save money during your visit to Iceland, including during your stay in the cozy capital city of Reykjavik.

Home to just 125,000 people, Reykjavik is a small city that is bustling with life and activities all year around. It’s artsy, cute, fun, and just filled with an awesome energy!

Whether you’re visiting Reykjavik on a weekend city break or planning to head out and explore the entire country,  there are plenty of ways to save money during your stint in the city!

To help you do that, here are my favorite free (or cheap) things to do in and around Iceland’s awesome capital:

Free Things to Do in Reykjavik

a hiking trail in Reykjavik
1. Take a Free Walking Tour
One of the best ways to start a trip to a new city is to take a walking tour. You’ll get to see the main sights, learn some history, and acclimatize to the culture. Plus, you have a local expert who you can ask questions to, which is an invaluable resource in and of itself!

The two companies I recommend are The City Walk and Free Walking Tours Reykjavik. You can’t go wrong with either. (Remember to tip your guide!)

2. Enjoy the Local Entertainment
Since the harsh climate forces many Icelanders to be indoors much of the year, they’ve developed a creative and artistic culture. There are lots of Icelandic painters, poets, writers, and musicians.  You can usually catch a free live show in Reykjavík at Café Rosenberg (sometimes there’s a cover charge at the door), Hlemmur Square Hostel (usually on Wednesday nights), KEX Hostel, HI Loft Hostel, and the Drunk Rabbit Irish Pub, which usually has someone who sings solo with his guitar.

3. Find Free Hot Springs
While the Blue Lagoon may be the most popular hot spring in the area, there are tons of others around the country that are free (or at the very least, less money than the Blue Lagoon). Visit the website Hotpot Iceland to find the best hot springs near the city. One nearby hot spring worth visiting is in Reykjadalur. It’s around a 40-minute drive from town and involves a bit of a hike to get there (about 30 minutes) but it’s much more secluded – and much less expensive – than the Blue Lagoon!

4. Hang out with the Locals
Iceland has a very active Couchsurfing community. I’ve stayed with hosts in Reykjavík as well as in Akureyri (Iceland’s main northern city). While many hosts are expats living in Iceland, it’s still a great way to save some money and get helpful local insights! Additionally, if you don’t want to stay with a stranger, there are usually weekly meet-ups you can attend! Make some friends!

5. Hit the Beach
Nauthólsvík is a man-made beach that not only has hot tubs but also a heated swimming area! It’s popular with locals and gets quite busy in the summer so make sure to come early to get a good spot. There is also a non-heated swimming area so if you’re feeling brave you can test the waters (spoiler: it’s cold).

6. Hike Mount Esja
If you’re looking to stretch your legs, head up Esja. The summit sits around 900m above sea level, offering you some amazing views of the city and surrounding area. Located just 10km from the city, the hike will take a couple of hours but the views are definitely worth it! Just make sure you check the weather as it’s unwise to hike during rain or snow.

7. Visit the Harpa Music Hall & Conference Center
Opened in 2011, this cultural and social center is worth checking out just to see the architecture for yourself. You can also catch the Iceland Symphony Orchestra, Reykjavik Big Band, and the Icelandic Opera here. The venue also hosts tons of other shows and performances as well, so check their website for an up-to-date schedule (performances will have a fee).

Austurbakki 2, +354 528 5000, en.harpa.is. See the website for perforamnce dates and times.

8. See Reykjavík’s Botanical Gardens
The city operates this beautifully-designed botanical garden that is home to over 5,000 plant species. You’ll also see ponds, birdlife, and beautiful flora dotting the small garden. There’s also a café nearby that’s open in the summer that features dishes made with herbs and spices grown on-site in the garden.

Laugardalur, 104 Reykjavík, +354 411 8650, grasagardur.is. Open daily from 10am-3pm (10pm in the summer).

9. Visit the Grótta Lighthouse
This lighthouse sits at the edge of the city and is a wonderful place to bird watch and gaze out at the stretching Atlantic ocean. It ’s a long walk along the coast from the city center but the scenic view and gorgeous coastal walk are definitely worth it. If you’re visiting in the winter months, this is also a great place to see the northern lights!

10. Walk (or Bike) the Coast
Reykjavík is a small city and its coastline is walkable (or bikeable if you want to rent one). Some great stops along the way are the Nauthólsvík Geothermal Beach and the Seltjarnarnes Peninsula. If you’re not interested in biking around by yourself, feel free to take a bike tour instead. Iceland Bike is the best bike tour company for this!

11. Visit Perlan
This is a dome-shaped building called “The Pearl” and it offers another great place to get a view of the city and surrounding area! On clear days you can see as far as Snæfellsjökull, the 700,000-year-old glacier-capped volcano that sits on the western coast of the island. Inside the dome, there is a cocktail bar and restaurant, so it makes for a nice place to go out and enjoy the view.

12. See the Sun Voyager
This iconic statue sits, known as Sólfar in Icelandic, was built in 1990 by Icelandic sculptor Jón Gunnar Árnason. It’s his interpretation of discovery, using the design of a traditional Viking ship to represent the promise of discovering new territory and the freedom that comes with traveling to new worlds.

13. Experience the Northern Lights
If you’re visiting Reykjavik between October and March you’ll have a good chance of seeing the Aurora on a clear night. You’ll want to get away from the city a bit to have the best view, as the light pollution will make it hard to see.

Cheap Things to Do in Reykjavik

Hallgrímskirkja chruch in Reykjavik
14. Take in the View from Hallgrímskirkja
This church is one of the most memorable that I’ve seen. The stark concrete façade was designed to mimic the Icelandic landscape (which I think it does quite well). It was named after the 17th-century clergyman and Icelandic poet Hallgrímur Pétursson, who wrote the Hymns of the Passion. It’s the tallest building in Reykjavík, and, for a small fee, you can go up to the top to get incredible shots of the city and its multicolored rooftops.

Hallgrímstorg 1, +354 510 1000, http://www.hallgrimskirkja.is/. Open daily from 9am-9pm in the summer and 9am-5pm in the winter. Entrance into the church is free but entry to the tower is 1,000 ISK for adults and 100 ISK for kids. The tower is closed on Sundays during mass.

15. Visit the Reykjavík Punk Museum
This museum is housed in an old underground public bathroom (seriously) and is dedicated to the punk and new wave scene that started took root here in the late 70’s. The museum highlights how many of Icelandic’s famous musical performers (like Björk) can be traced back to their punk roots. It’s definitely worth a visit.

Bankastræti 2, 101 Reykjavík, +354 568 2003, thepunkmuseum.is. Open Monday to Friday from 10am-10pm and weekends from 12pm-10p. Admission is 1,000 ISK for adults and free for kids 15 and under.

16. See the National Gallery of Iceland
If you’re a fan of art, especially modern art, you won’t want to pass up a trip here. The museum is focused on Icelandic artwork from the 19th and 20th century and highlights the diverse nature of the art scene in Iceland. While it is mostly local artists, some foreign works are showcased here as well.

Fríkirkjuvegur 7, 101 Reykjavík, +354 515 9600, listasafn.is. Open daily from 10am-5pm in the summer and from 11am-5pm in the winter (closed Mondays in the winter as well). Admission is 1,500 ISK for adults, 750 ISK for seniors and persons with disabilities, and free for kids age 18 and under. Buy one ticket for 1,500 ISK valid for three museums: The National Gallery of Iceland, the Sigurjón Ólafsson Museum, and the Ásgrímur JónssonCollection.

17. The Icelandic Phallological Museum
This is one of the weirdest museums you’ll ever have a chance to go to – which s partly why you should go! Entirely not sexual, the museum has collected penises from varies species roaming the earth, land, and sea. The founder, an Icelandic historian named Sigurdur Hjartarson, started the penis museum as a joke but it’s become something much more. The whole museum is pretty small so you won’t need more than 30-60 minutes, but it’s pretty interesting and informative; you’ll actually learn a lot about how species procreate (in addition to seeing a lot of…well, exhibits).

Laugavegur 116, 105 Reykjavík, +354 561 6663, phallus.is. Open daily from 10am-6pm. Admission is 1,500 ISK for adults, 1,000 ISK for seniors and persons with disabilities, and free for kids 13 and under.

18. Head to Videy Island
This is a small island located just off of Reykjavík. It’s a great little island for a picnic or a stroll if you’re looking for something a bit off the usual tourist trail. The island is most famous for the Imagine Peace Tower, envisioned and built by Yoko Ono. On each 9th of October, Yoko Ono comes to light the tower on the birthday of John Lennon, and it is lit until December 8th, the day John was killed. The ferry is operated by daily in the summer and on the weekends in the winter.

Skarfabakki Pier and Ægisgardur Harbor, +354 519 5000, elding.is/videy-ferry-skarfabakki. Round-trip tickets are around 1,550 ISK for adults, 775 ISK for students aged 7-17, and free for kids under age 6. On October 9th, the ferry trip is free for everyone in honor of the Imagine Peace Tower ceremony.

19. Visit the Saga Museum
Iceland was first inhabited by Norwegian Vikings in the 9th century. The high-action wax sculpted scenes are an interesting way to learn about Viking times when life was hard and dependent on the harsh elements, and people were poor. It’s a good family activity.

Grandagardur 2, 101 Reykjavík, +354-694-3096, sagamuseum.is. Open daily from 10am-6pm. Admission is 2,100 ISK for adults, 1,600 ISK for students and seniors, and 800 ISK for children.

***

By taking advantage of these free and cheap activities (as well as some money-saving tips) you’ll be able visit Reykjavik without blowing the bank. Sure, there are plenty of things to see and do in Reykjavik that are worth spending money on, but if you mix and match those activities with these budget-friendly ones you’ll be able to visit the Land of Fire and Ice with your wallet still intact.

Book Your Trip to Iceland: Logistical Tips and Tricks

Book Your Flight
Find a cheap flight by using Skyscanner or Momondo. They are my two favorite search engines because they search websites and airlines around the globe so you always know no stone is left unturned.

Book Your Accommodation
You can book your hostel with Hostelworld. If you want to stay elsewhere, use Booking.com as they consistently return the cheapest rates for guesthouses and cheap hotels. I use them all the time. My favorite places to stay in Reykjavik are:

  • Hlemmur Square – A posh hotel with a great bar and traditional Icelandic communal dinners several times a week.
  • Kex Hostel – Has a café and bar with an awesome happy hour, a comfy lounge, and a heated patio.

Don’t Forget Travel Insurance
Travel insurance will protect you against illness, injury, theft, and cancellations. It’s comprehensive protection in case anything goes wrong. I never go on a trip without it as I’ve had to use it many times in the past. I’ve been using World Nomads for ten years. My favorite companies that offer the best service and value are:

Looking for the best companies to save money with?
Check out my resource page for the best companies to use when you travel! I list all the ones I use to save money when I travel – and I think will help you too!

Looking for more information on visiting Iceland?
Check out my in-depth destination guide to Iceland with more tips on what to see, do, costs, ways to save, and much, much more!

The post 19 Free (Or Cheap) Things to Do in Reykjavik appeared first on Nomadic Matt's Travel Site.

My Top Gifts for Travelers for the Holidays

A small digital camera wrapped in Christmas lights in front of a bright pink background
Last Updated: 10/30/23 | October 30th, 2023

Travelers can be a fickle group of people to buy gifts for. We’re constantly coming and going, we usually don’t carry a lot of stuff with us, and no two travelers are alike. Finding the perfect gift for the traveler in your life can be tricky.

While a plane ticket is never a bad idea (I’m a window seat in case anyone is thinking of getting me one), I’ve put together this ultimate gift guide for travelers as there’s a lot of great travel gear out there these days that helps people travel cheaper and better.

Even me, the gear-adverse traveler, likes a lot of this stuff!

This is stuff I actually think is super useful. No nonsense. No fluff. Just the best gifts for intrepid travelers and globetrotting nomads.


Gifts Under $25

1. A Travel Lock

Master travel padlockThis simple item is one of the most important for the budget traveler. Since many hostels have lockers, backpackers need to have their own travel lock when they’re on the road. While you can usually rent them at hostels, those prices add up after a while. I never leave home without a lock because I know it will come in handy.

Buy now on Amazon!


2. Loop Earplugs

travel ear plugsAnyone who has ever stayed in a hostel knows that a quality pair of earplugs is a necessity. From chronic snorers to late-night drinkers to copulating couples in creaking bunks, hostels are known for their less-than-quiet accommodation. I suggest investing in good earplugs and not just the cheap foam ones. Not only will they help you sleep, but they’re great for bus trips and flights as well as wearing as you explore louder, more hectic cities.

Buy now on Amazon!


3. Travel Adapter

travel adapterNothing is more tedious than arriving to a new destination only to realize you can’t charge your devices because the electrical outlets are different. That’s why you’ll need a travel adapter. They’re a simple accessory. There’s a million out there but this is one I use as it covers every region of the world and comes with USB ports too. It’s cheap, easy to use, and lightweight. Everything you need in an adapter.

Buy now on Amazon!


4. Scratch Travel Maps from Landmass

travel scratch mapScratch maps are a fun way to keep track of your past travels while helping you stay inspired as you plan your future trips. You simply scratch off the parts of the world you’ve been. Simple. Easy. Landmass is my favorite company that makes these, though there are plenty of other companies that make them now so you can find them in all sorts of sizes and colors.

Buy now on Amazon!


5. Passport Holder

A blue passport walletA passport holder is a must-have for any avid traveler. Not only does it protect your passport from wear and tear, it makes your travels much more convenient. Most passport holders have slots for your travel credit cards as well as any cash you have, making it a safe and convenient way to keep your valuables secure while you travel. While there are tons of expensive and fancy passport holders out there, a simple one will get the job done and save you money in the process (money you can spend on more travels!).

Buy now on Amazon!


6. Hand-drawn Food Maps

hand drawn food maps from Legal NomadsThese are unique, hand-drawn typographic maps of food from Legal Nomads and artist Ella Frances Sanders. They make a thoughtful gift for anyone who loves to eat and travel (and who doesn’t!). They come in a variety of sizes too! Jodi’s maps are the best!

(Use code NOMADICMATT to save 10%)

Buy now at Legal Nomads!


7. Ten Years a Nomad (and Other Travel Books!)

$50 a day by Matt KepnesThis book is my memoir about my ten years traveling and backpacking the world, my philosophy on travel, and the lessons I learned that can help you travel better. It takes you on a trip around the world from start to finish: getting the bug, the planning, setting off, the highs, the lows, the friends, what happens when you come back — and the lessons and advice that come with all that. People have been really enjoying and connecting with it and I think you or any other traveler would love it!! (Plus, getting it helps support everything we do here!)

Buy now on Amazon!

Buy now on Bookshop!

 
For more travel book suggestions, you can check out my list of recommend reading on Amazon and Bookshop (I have hundreds of book suggestions there!).
 

8. Celiac Travel Cards

Legal Nomads celiac logoMy friend Jodi from Legal Nomads created these helpful travel cards for anyone traveling with Celiac disease. They are in-depth resources that communicate your concerns to restaurant staff in a way that allows anyone traveling with the disease to have a worry-free meal. If you or someone you love has Celiac disease, these travel cards are a useful resource!

(Use code NOMADICMATT for 10% off!)

Buy now at Legal Nomads!


9. Dry Shampoo

Lush's dry shampoo in a clear plastic bottle
Dry shampoo is a convenient liquid-free alternative to regular shampoo. It’s a useful minimalist solution for budget travelers who travel carry-on only and an eco-friendly choice as well. Natural dry shampoos absorb the grease and oil in your hair, keeping it clean while you’re on the road — and with minimal effort too. It works for all types of hair and hair lengths as well so you don’t need to shave your head or do anything drastic either.

Buy now at Lush!


10. Packing Cubes

travel packing cubesPacking cubes are an awesome tool to help you stay organized while you travel. Whether you’re a budget backpacker or traveling with half a dozen suitcases, packing cubes will keep you organized as you travel the world. They come in a variety of sizes, allowing you to store items big and small. If you know a traveler who needs a hand staying organized, this is the gift for them!

Buy now on Amazon!


11. Exploration Journal

The Remember Your Travels travel journalIf you want a travel journal that isn’t just blank pages (like my boring moleskine) but rather has space for itinerary planning, places to jot notes in the local language, inspirational quotes, and much more, grab our new travel journal. It was designed specifically with travelers in mind, so you can take notes and write down stories and reflections during your travels. It’s the perfect gift for the avid traveler!

Buy now at Remember Your Travels!


Gifts Under $100

12. HostelPass

The homepage for the website HostelPassFor the traveler heading to Europe, consider gifting a HostelPass. This discount card offers over 130 discounts to hostels in 40 cities throughout 15 countries in Europe. With HostelPass, travelers can save up to 40% on accommodation. It’s the discount card I wish existed when I first started backpacking around Europe and is perfect for budget traveler planning a trip around the continent.

Buy now at HostelPass!


13. DryFox Quick Dry Travel Towel

sea to summit travel towelUnless you’re only staying at hotels or using Airbnb, you’re going to need to bring a towel when you travel. Having a lightweight, quick-drying towel makes a huge difference when you’re on the road since regular towels are too bulky and heavy (and they take a long time to dry). Get a travel towel for your next trip so you can travel light. They’re a compact, quick-drying solution that every backpacker needs.

(Use code “nomadicmatt” for 15% off your purchase!)

Buy now at DryFoxCo!


14. Menstrual Cup

A menstrual cup being held by a womanMenstrual cups are reusable, eco-friendly feminine hygiene products. While I can’t speak to their effectiveness personally, tons of female travelers I know are huge fans. It can be a hassle trying to find the products you need while abroad, making this a simple, effective, and affordable addition to your toiletry kit.

Buy now on Amazon!


15. Trtl Travel Pillow

a comfortable travel pillowTravel pillows are perfect for those long-haul flights, delayed buses, and airport naps. Every traveler needs to have a travel pillow on hand to maximize that downtime and time in transit, and Trtl pillows are the best on the market. They help prevent jet lag and make even the longest, most uncomfortable trip a little more bearable.

Buy now on Amazon!


16. Travel Headlamp

travel head lampThis is a handy tool for both backpackers and anyone looking to do any hiking or camping. In a hostel, a headlamp is helpful if you need to check in or out but don’t want to disturb your fellow travelers. For outdoorsy folks, they’re useful for hiking, setting up camp in the dark, and for emergencies.

Buy now on Amazon!


17. External Battery

Anker external batteryThese days, we all travel with numerous electronic devices like phones and tablets. It can be hard to keep them all charged. An external battery solves that problem. Two high-output USB ports make this external battery incredibly convenient, and it can charge most phones up to 6 times in one go!

Buy now on Amazon!


18. LifeStraw

lifestraw water filterEnvironmentally, pollution from single-use plastics is something every traveler has witnessed. And, monetarily, when you’re traveling, continuously buying water gets expensive. Do your part to help the planet by traveling with a reusable filter. LifeStraw is an awesome brand with a built in water filter. The filters last 5 years so you save money on changing them too.

Buy now on Lifestraw!


19. Superstar Blogging

Superstar BloggingIs there someone on your list looking to start a new career? Why not give them a leg up and enroll them in Superstar Blogging! We offer comprehensive courses on blogging and travel writing that outline everything you need to know to succeed in the travel industry. You’ll learn from me and other top travel experts on how to level up your game, reduce mistakes, get you heard above the noise faster, and make more money.

Buy now on Superstar Blogging!


Gifts Over $100

20. Suavs shoes

suavs shoesSuavs shoes are super versatile and durable, making them perfect for traveling. Whether you’re just exploring the city or in need of something that looks a bit fancier, these shoes can do it all so you don’t have to pack multiple shoes. They are flexible, light, washable, and breathable. I love them! (They look great too!)

Buy now at Suavs!


21. Travel Backpack

REI Flash travel backpackIf you’ve got a budget traveler on your holiday list, a travel backpack is the gift that keeps on giving. A well-made bag will last for years and through dozens of adventures. Having a reliable travel backpack is one of the most important items for a traveler.

My favorite bag is the Flash 55 from REI but other companies that make high-quality bags include Osprey, Nomatic, and MEC (for Canadians).

Some bags worth checking out are:

(For a different backpack, check out my guide finding the right backpack for more options!)
 

22. Travel Clothing from Unbound Merino

Unbound Merino wool shirtThese travel clothes are some of the most versatile on the market. Made from merino wool, Unbound offers clothing that can be worn daily for weeks (and months!) without getting smelly. They are perfect for the traveler who wants to pack lighter. I really love the material, they’re comfortable, they hardly ever need a wash, and they last forever!

Buy now at Unbound!


23. MacBook Air

MacBook Air laptopThis is my favorite travel computer. It’s light, it’s powerful enough for regular use, and the battery life lasts a long time. While an iPad might be another potential travel choice, I find the Air much more versatile — especially with their new M2 chip. You can just do a lot more with it. When I’m on the road, this is the laptop I travel with.

Buy now on Amazon!


24. iPhone

The new iPhone 13While not a cheap phone, the iPhone has such a high-tech camera that you don’t need to take a traditional camera with you when you travel. It has a solid battery life, a great lens, beautiful screen, and, overall, is just awesome. True, I’m an Apple fanboy so I might be biased but hey, it’s my list!

Buy now on Amazon!

 
For a non-Apple phone with an equally awesome camera, check out the Google Pixel. It has an excellent camera!
 

25. Noise-Canceling Headphones

Bose QC35 headphonesThese are ideal for those long flights or bus trips as they block out background noise so you can read, work, or sleep without being disturbed. The wireless Bose QuietComfort 45 headphones are fan favorites and my go-to brand. They are comfortable, rechargeable, and do an amazing job at removing background noise. If you’re on a budget, consider the QuietComfort 25 instead.

Buy now on Amazon!


26. Kindle

a kindle from AmazonWhile I personally prefer to read physical books, I can’t argue against the convenience and simplicity of the Kindle. Hauling around physical books is a pain if you’re traveling often. With a Kindle, you can pack over 1,000 books into a single device and many versions can also use apps and access the internet. It’s a wonderful gift for the avid reader.

Buy now on Amazon!


27. GoPro Hero 11

gopro hero 11 photoEvery traveler needs a camera, and few are as versatile and durable as the GoPro. They’re incredible for photos and video no matter the climate. They’re waterproof and are perfect for both everyday city exploring as well as more extreme and adventurous activities. They’re just awesome. If the Hero 9 is too pricey, grab the 8. It’s just as good and a bit cheaper!

Buy now on Amazon!

***

Whether you’re searching for the perfect holiday gift for a traveler in your life or just looking for some inspiration for yourself, this list will help you find an awesome gift. No matter your budget, there is something here for you to help you level up your travels or the travels of a loved one.

Book Your Trip: Logistical Tips and Tricks

Book Your Flight
Find a cheap flight by using Skyscanner. It’s my favorite search engine because it searches websites and airlines around the globe so you always know no stone is being left unturned.

Book Your Accommodation
You can book your hostel with Hostelworld. If you want to stay somewhere other than a hostel, use Booking.com as it consistently returns the cheapest rates for guesthouses and hotels.

Don’t Forget Travel Insurance
Travel insurance will protect you against illness, injury, theft, and cancellations. It’s comprehensive protection in case anything goes wrong. I never go on a trip without it as I’ve had to use it many times in the past. My favorite companies that offer the best service and value are:

Want to Travel for Free?
Travel credit cards allow you to earn points that can be redeemed for free flights and accommodation — all without any extra spending. Check out my guide to picking the right card and my current favorites to get started and see the latest best deals.

Ready to Book Your Trip?
Check out my resource page for the best companies to use when you travel. I list all the ones I use when I travel. They are the best in class and you can’t go wrong using them on your trip.

The post My Top Gifts for Travelers for the Holidays appeared first on Nomadic Matt's Travel Site.